 | OccuRec |
Extracting times from a KIWI OSD video
This is an example of integrated AAV video timestamped by KIWI OSD where OccuRec wasn't reading the timestamps on the fly and the only source of time reference is the video field OSD timestamps generated by KIWI OSD and placed by OccuRec in each integrated video frame from the first and last video field in the integration period. Many thanks to Brian Loader for recording this video for this example.
You can download the AAV file from here: KIWI-OSD-Sample - Brian Loader.aav (1.9 Mb)
To go through the example you will also need Tangra3 ver 3.0.36 or later. The latest version of Tangra3 is available from http://www.hristopavlov.net/Tangra3.
Start Tangra3 and don't open the AAV file yet. Go to Settings -> Video -> Astro Analogue Video, then uncheck the "Split Fields OSD" checkbox at the bottom right (if checked). Now open the AAV video file and choose to do a Light Curve Reduction. You will notice that the first frame of the AAV video will look familiar to you as the KIWI OSD timestamp will not appear blurred (apart from the start milliseconds of the first field and the end milliseconds of the last field - which is something you will be used to as a KIWI OSD user). If you however move to the second frame then you will notice that the timestamp will now look very much blurred and you cannot read it.

This is because of the way the interlaced analogue video works and because the exposure was more than a single frame. If you choose "Frame Actions" -> "Show Fields" from the Tangra menu you will see the two fields separated and now you will identify that the two fields have clearly readable timestamps. You will notice that the field numbers stamped by KIWI OSD for the top field is 45534 and for the bottom field is 45549. This is a difference of 15 and corresponds to 16 video fields in total (counting both the first and last field). This means that the camera has been running in 16 fields integration mode which corresponds to x8 frames integration.
Tangra3 has the ability to split only the OSD timestamp area when displaying an AAV file making it possible to read both the start and end timestamp and at the same time to display the rest of the video image as a single frame, which allows selecting stars and measuring the video. Now go back to the menu Settings -> Video -> Astro Analogue Video and now check the "Split Fields OSD" checkbox. Once you close the form you will see that the timestamp is now displayed in two lines and is readable:

This mode of separating the timestmps is used only when the displayed frame is actually an integrated frame. The very first frame of every AAV file is however not an integrated frame (on purpose) and its timestamps are not going to be separated. So if you move back to the first frame and display the two fields again (using Frame Actions -> Show Fields from the menu) you will see that the field numbers are 45534 and 45535 i.e. this is a single standard video frame with 2 consecutive fields. The reason why OccuRec inserts as a first frame a standard video frame is to help identify how the hardware grabber combined the fields and potentially identify issues of incorrectly composed video fields in a frame, which could happen in very rare cases.
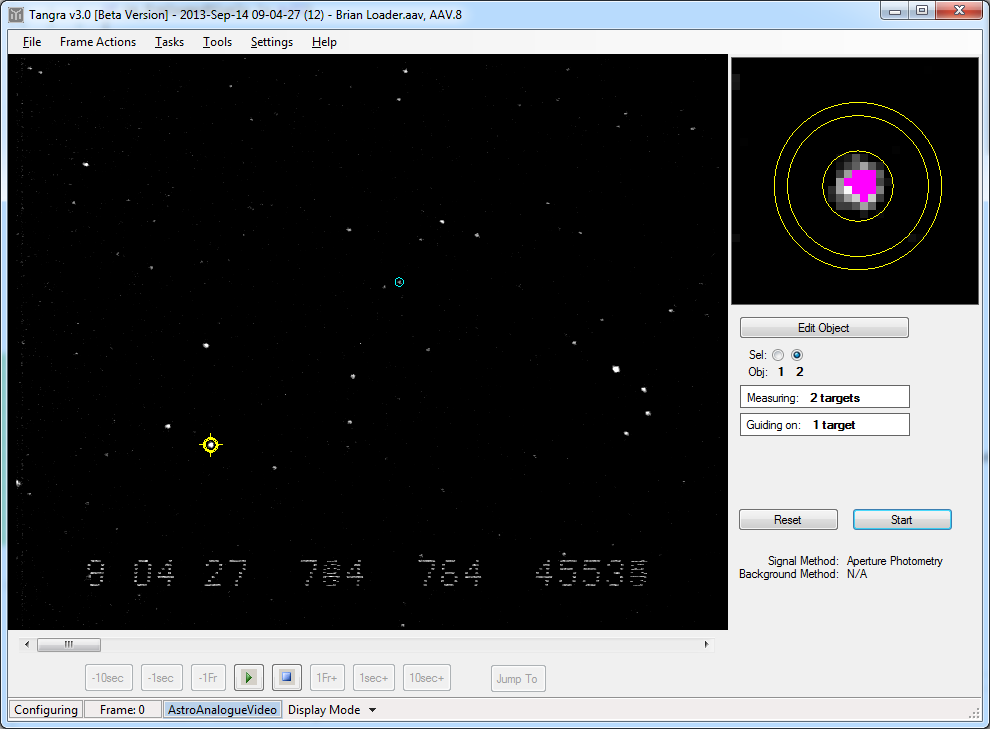
Now let's add an occulted star and a guiding star to measure, for example choosing these ones:
Leave the measurement to continue until the end of file, where it will stop automatically. Because this AAV file doesn't contain embedded timestamps, Tangra3 will position you to the first measured frame and will ask you to enter the timestamp corresponding to this frame. Now if you have followed the guide strictly and have configured the objects to be measured on the very first frame and if you had the Settings -> Tracking -> Refining Frames set to 8 (the default value) you will end up with Tangra3 displaying the following frame and asking you to enter times:
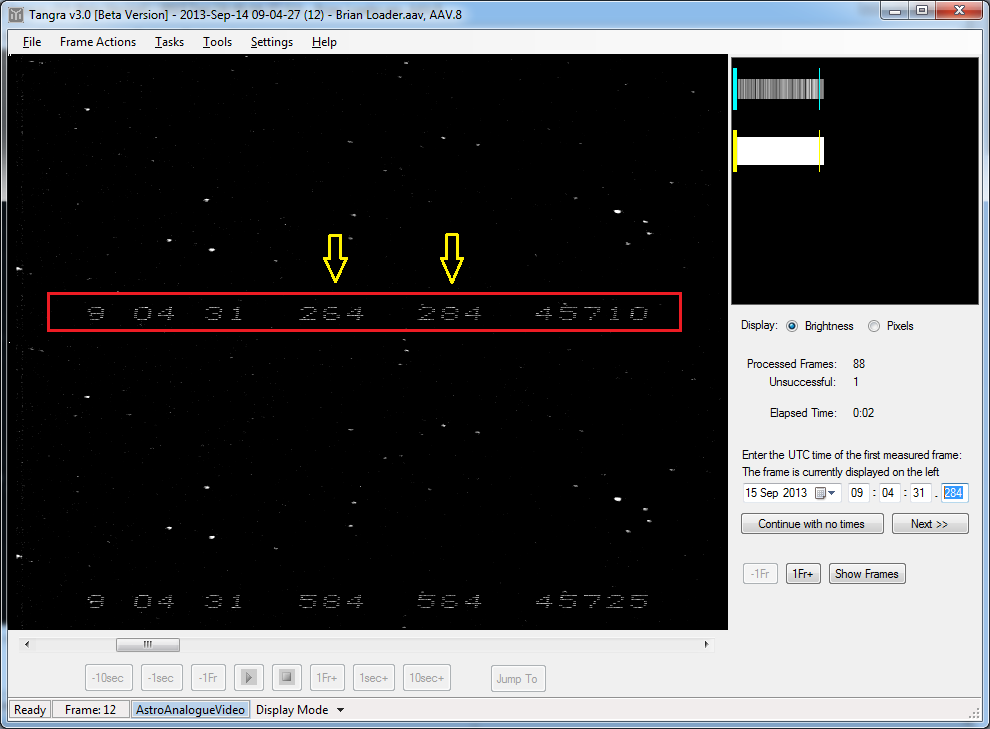
When entering the times Tangra3 will always split the whole frame into the 2 fields, rather than only splitting the OSD timestamps. The field that was received first should be at the top and the field that was recorded second at the bottom. In the case of AAV file where only one video frame is recorded for an integration period, the top field will contain pixels from the averaged odd fields and the bottom field will contain pixels the averaged even fields. The timestamp of the top field will be the timestamp from the first (odd) field from the integration period and the timestamp of the bottom field will be the timestamp from the last (even) field from the integrated period. For our frame we can see that the top field number is 45710 and the bottom one is 45725. This is a total of 16 fields or 8 frames.
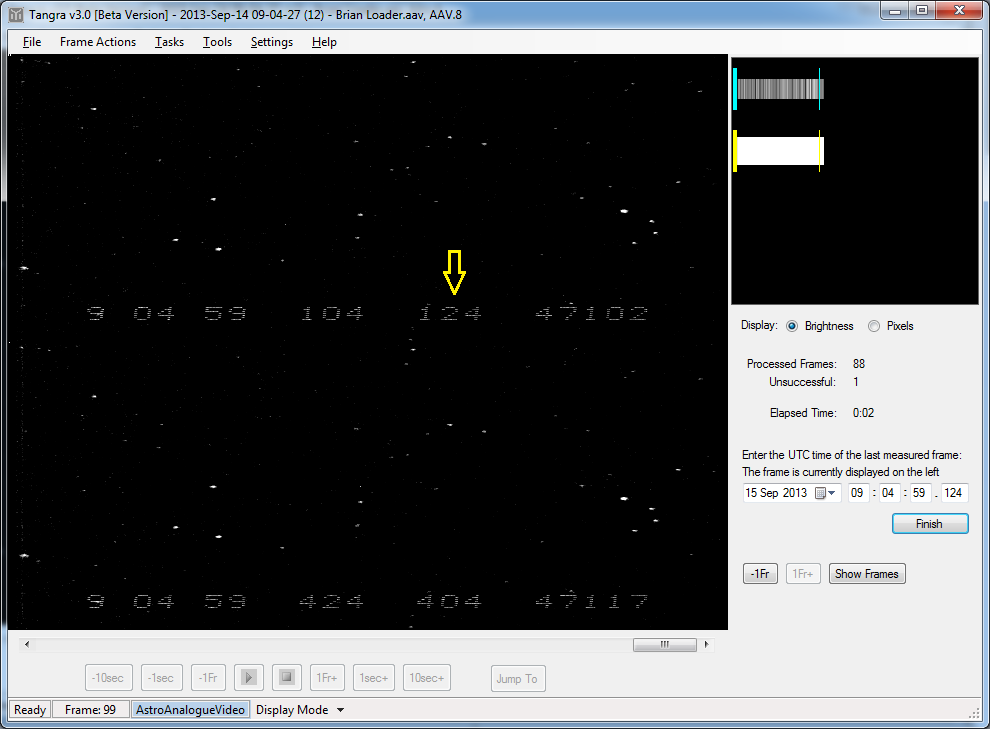
The timestamp that we need to enter in this case (and in all cases where AAV files don't contain embedded times) is the end time of the first field. This will be the timestamp of the top field, so in this case we enter: 09:04:31.284. After we press "Next" Tangra moves to the last measured frame and ask us to enter the time again. This time we enter 09:04:59.124.
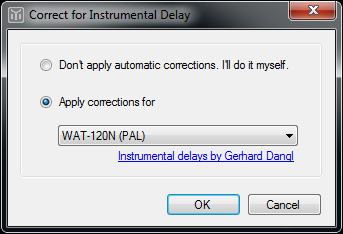
After pressing "Finish" Tangra3 will ask for confirmation of the camera model being used so it can apply instrumental delay to the times. The camera model is saved in the AAV file and will be automatically selected if the used camera has known instrumental delay pattern. The user could also choose not to have Tangra apply instrumental delay to the displayed times. In out case the selected camera will be WAT-120N (PAL) so we just confirm by pressing "OK".
Tangra will now display the light curve as with other measured video files. When the user selects a point from the light curve the corresponding time will be displayed at the bottom. If there was a camera selected for applying instrumental delay, then Tangra will display the actual UT time corresponding to the exposure which will be corrected for instrumental delay. A green asterisk in front of the time will indicate the instrumental delay has been applied. When hovering the mouse pointer over the asterisk an tooltip will be dospplayed that will give aditional information.
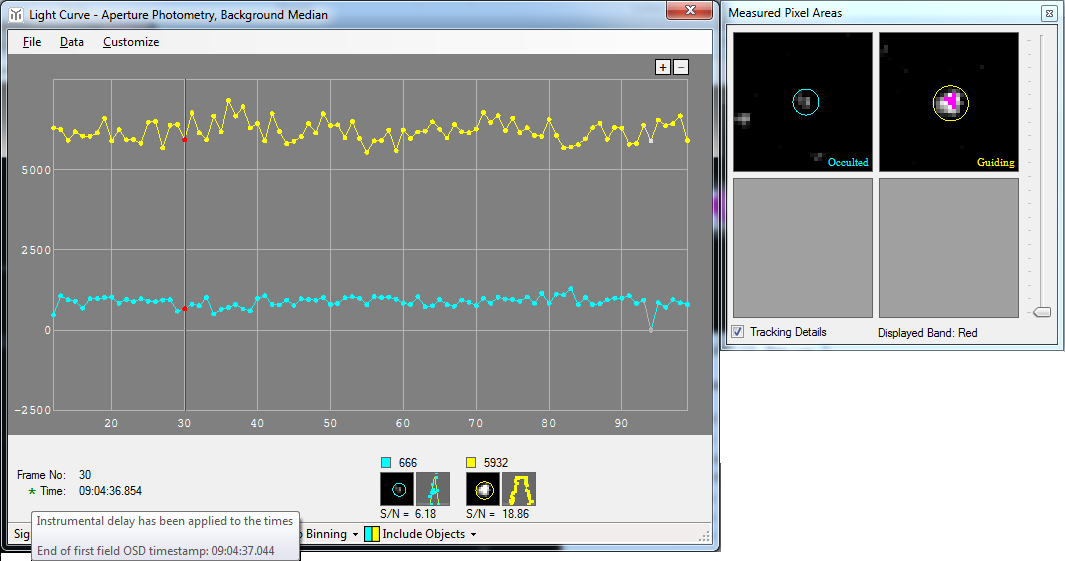
In our case the tooltip shows that the timestamp corresponding to the end of the first field is 09:04:37.044. Checking the selected frame to the left we indeed identify that this is the correct end time of the first field. This could be used as a manual check that the times correspond to the measured video frame (as opposed to the times corresponding to the values entered by the user).

As you can see the process of entering times for AAV videos is no different than the process of entering times for standard AVI files, it is only the AAV specifics that create a difference.