 | OccuRec |
| OCCUREC | HOW TO USE OCCUREC | NTP TIMING | READING TIMESTAMPS | INTEGRATION DETECTION | AAV FILE FORMAT | LICENSE | DOWNLOAD |
Before the very first use
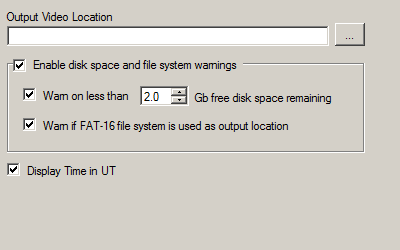
Before using the program for a very first time the user should review the Settings form and configure some of the General tab settings. OccuRec will generate file names automatically and will not ask you every time where to save the file. For this to work however you will need to configure the output directly (Output Video Location) where all files will be stored. By default OccuRec will warn you about certain potential issues related to disk space available and file system you are using. For example certain file systems (such as FAT and FAT32) have a limit of the largest single file that can be saved on them. Because video files recorded for long periods of time can get very large it is important to know what is the largest file you can record in your chosen output directory. Once the free disk space on the disk where the files are saved starts to get below 2 GB OccuRec will start displaying a warning with the remaining disk space in the status bar. If you do not wish to see those warnings every time you can uncheck the "Enable disk space and file system warnings" checkbox.
To use the scheduled recording successfully there are two important issues to be addressed: That you know what time you configured the scheduler to start the recording at and that OccuRec is able to start at that time. If you are using OccuRec to time events, then your system is probably already having a GPS timestamp inserted in every video frame. So when you look at the coming video signal you can tell immediately what is the time with a precision of a second or better. OccuRec however may not be able to read the timestamp and probaly doesn't know the time with such precision. To solve this problem OccRec is synchronising the computer clock with an NTP server which usually gives a precision of 1 sec from UT. By default OccRec will use the standard windows NTP server time.windows.com. However you must be connected to the Internet for OccuRec to be able to sync the computer clock. If you prefer setting the start time for a scheduled recording in UT then you need to ensure the "Display Time in UT" is checked (which is its default value).
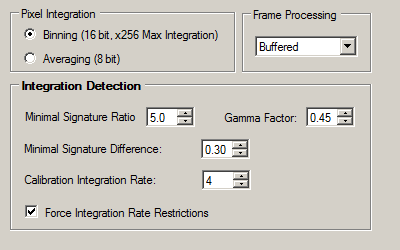
The AAV tab of the settings form contains items that you are less likely to have to change. The "Force Integration Rate Restrictions" (which is checked by default) will only accept an integration rate detected by OccuRec that is multiple of 2 and 3. This is done so if the integration detection is not working for your camera you don't see unusual falsely detected integration rates. However some cameras may support an unusual integration rate (such as the WAT-910HX which integrates at 127 frames in its x256 mode). In order to be able to use such integration rates you need to ensure this check box is unchecked.
In order to use Calibration of the integration rate detection OccuRec will need to know what is the rate of your camera. This is controlled by the "Calibration Integration Rate" control. By default this is 4. You will probably never have to change the other controls on the AAV tab, unless you are asked to when troubleshooting integration detection issues with your equipment.
Connecting to the Camera
As OccuRec is designed primeraly to record in AAV format, only the settings when connecting using the AAV format will be reviewed next.
Once you have reviewed and modified if required the settings of OccuRec you need to press the connect toolbar button or use the menu "Connect AAV", to connect to a camera/video grabber. OccuRec uses DirectShow to capture video from your hardware and will only offer you the options that your hardware supports when connecting to a camera (with the exception of standard PAL and NTSC). It will not offer video frame sizes and frame rates that are not directly supported by your grabber. Standard PAL (720x576 @ 25fps) and NTSC (720x480 @ 29.97fps) will be always offered even if the camera doesn't report to support them. Some drivers, frame grabbers and/or cameras may report incorrectly to Windows what video modes they support and they may be still able to work okay in PAL/NTSC even when this is not one of the modes they report to Windows to support. If you hardware and drivers report to support standard PAL/NTSC then they will be displayed in green (image one bellow), otherwise they will be displayed in red (image three bellow).

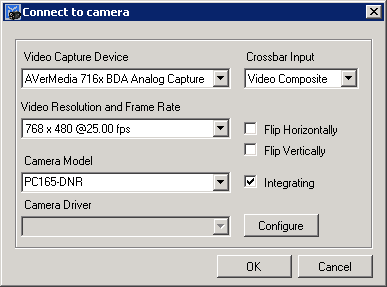
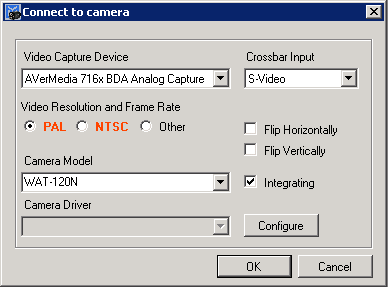
The "Video Capture Device" dropdown will show a list of all video capture hardware connected to your computer which supports DirectShow capturing and which OccuRec has found. If you cannot see your device here then make sure it is installed property and that it supports capturing via DirectShow. Most capture PCI cards and USB dongles should support this type of capturing. Generally speaking OccuRec can see your hardware only if VirtualDub can see it too.
The standard video resolution is 720x576 for PAL and 720x480 for NTSC. These are the only resolutions for which the original pixels coming from the camera is probably not modified (scaled to a different aspect). These are also the only resolutions at which the reading of the IOTA-VTI timestamp may work.
You will also need to configure your camera model by picking one from the list or typing the model in the edit box if your camera is not listed. OccuRec will happily accept any "model" you specify and is unable to tell if your camera model is indeed the one you picked, so configure this item carefully. Having specified the camera model will be useful when reviewing your observation at a later time to 'remind you' what camera you have used for the recording. Tangra will also read the recorded camera and will offer to apply instrumental delays if they are known for this camera model.
If your selected camera model can be controlled remotely then OccuRec will offer you to choose a camera driver to use. At this time the only camera that supports remote control is the WAT-910BD which can be controlled via the T.A.C.O.S. video driver.
Recognizing and locking integration rate
Once you are connected to your camera the main form of OccuRec will be displayed. The very first thing that OccuRec will try to do is to recognize the area of the screen where your VTI OSD timestamp is located. It is likely that OccuRec will do this automatically. In this case the 'recognized' area will be marked in a green rectangle and a OccuRec will count down for 6 seconds so you can 'see' where it believed the timestamp is located.
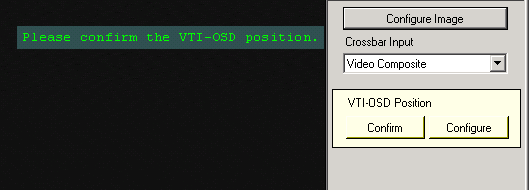
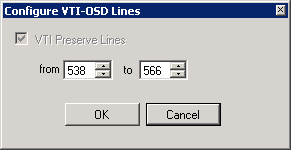
If OccuRec is unable to locate your timestamp then it will ask you to confirm or configure the timestamp position. Because OccuRec stacks video fields which are already timestamped by a VTI, it is essential to configure the TVI-OSD position so the timestamps of the stacked video fields do not get blurred as a result of the stacking. In order to achieve this OccuRec will stack all fields in the detected integration interval but will keep the timestamps of the first and last field untouched. In order to be able to do this, OccuRec must know exactly where the VTI-OSD position is.
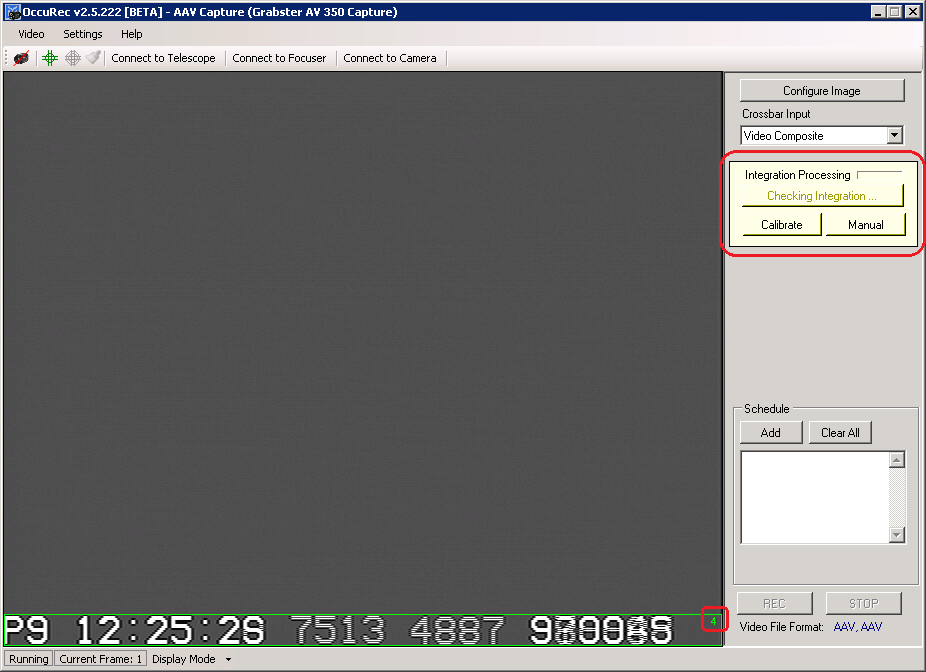
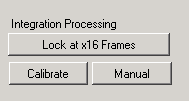
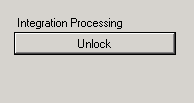
Once OccuRec is receiving data from your video camera and it knows where the VTI-OSD position is, it will immediately try to detect what integration rate your camera is running at. Before you can record a video in AAV mode OccuRec must detect successfully your integration rate and you must "Lock" to this integration rate (which will cause only one frame per integration period to be processed). Below are shown different states of the integration detection controls at the upper right part of the form:
 |
 |
 |
 |
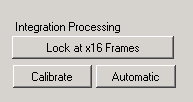 |
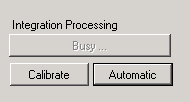
| Integration rate not determined. | Integration rate has been detected successfully in automatic mode. | The integration has been locked by the user. | In process of performing a calibration in automatic or manual mode. | Integration rate has been detected successfully in manual mode. |
There are generally two scenarios here. Either the integration rate will be detected automatically and you will only need to press the "Lock at xAA Frames" button or the integration rate will not be detected automatically. In the second case the user may see various inconsistent rates being suggested or the control may be showing the tiny progress bar left of the "Integration Processing" label and may never enable the "Checking Integration" button. If this is what you see then you have a few options.
Firstly if your camera is non integrating camera or if it is running at x2 frames integration, then the automatic integration detection mode will not work for you. In this case you will have to press the "Manual" button to specify your integration rate:
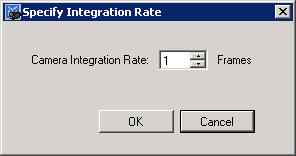
Choose your camera rate and press "OK". OccuRec will then briefly enter in a manual integration calibration mode showing a larger progress bar in the status bar. After the calibration is completed, OccuRec will return back to detecting your now manually given integration rate of your camera. If the integration rate of your camera matches the rate given by you, OccuRec should be able to recognize it at this point. It is also important to note that some cameras, such as cameras based on Mintron, use an unusual field combination pattern in mode shorter than x12 fields and OccuRec will not be able to recognize the integration at those integration rates for those cameras even in Manual mode.
Another reason for the automatic integration detection not to work could be that your image is too dark or too bright. If that's the case you can try to run the automatic mode calibration by pressing the "Calibrate" button. When you do this OccuRec will ask you to put your camera in x4 frames integration (by default) and will then run its calibration routines. A progress bar will be displayed in the status bar while the operation is executed. Once the calibration has finished OccuRec should be able to recognize your camera integration rate. If this doesn't happen then you can also try a Manual integration mode with integration rates higher than 2. This should also work.
Most integrating cameras used with their usual settings should not have problems with the integration detection of OccuRec. If you have systematic problems with OccuRec not being able to detect the integration rate of your camera then you should contact the author.
Recording a video
Now that you have the integration rate detected you will need to lock this integration rate before you can record a video. Once you have locked it the "Start" button will get enabled and pressing it will begin recording a new AAV video.
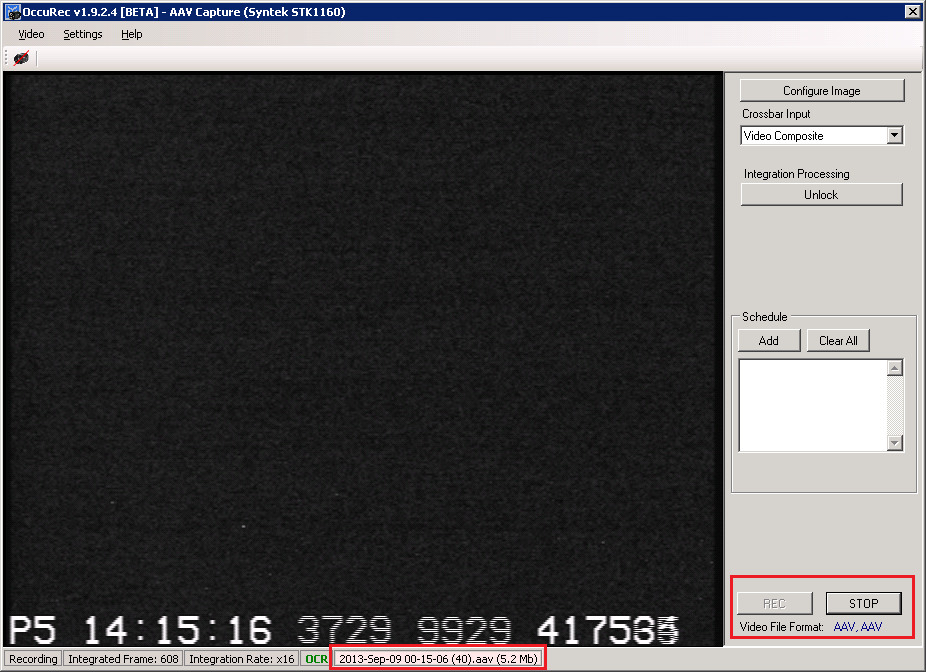
In the status bar OccuRec will display the file name of the new video file and its current file size. If the disk where the recording is being done is running low on disk space (less than 2Gb available) OccuRec will also display the remaining free disk space next to the recorded file info.
Scheduling a recording
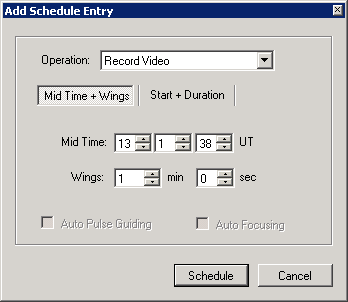
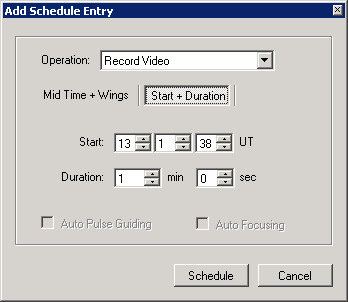
To schedule a new video recording press the "Add" button in the schedule panel. There are two modes in which you can schedule the recoprding - (1) by specifying the centre time and time interval from each side of the centre time to record for and (2) by specifying a start time and a total duration.
Recommended Settings for Jovian Mutual Events (PHEMU)
These settings are recommended for recording PHEMU events or any other events involving bright objects that may take long time - 30 min to 2 hours.
Before you star recording you should configure the compression and bit-depth settings as follows:
- From the Settings go to "Advanced" tab, tick "ADV Compression" and choose "Lagarith 16"
- From the Settings go to "Astro Analogue Video (AAV)" and for "Pixel Integration" ensure that "Binning (16 bit, x256 Max Integration)" is selected
Once you have the system running, use the following integration settings:
- Set your integrating camera to no integration or to use exposures shorted that 1 video frame. Non integrating video camera can be also used.
- Set a 'Manual' integration of x1 and 'Lock' the integration rate.
- Click the "x1 Stacking" button and choose a stacking mode. Adjust the stacking timespan according to the expected event duration and wind conditions. For example for a 2 hour event you can use x128 or x64 stacking while for 5 min event you should use x2 or x4 stacking. If you have windy conditions consider using smaller stacking in order to avoid trailed images.