 | Occult Watcher 3.2 |
| EVENTS | CONFIGURATION | EVENT DETAILS | OBSERVATION PLANNER | C2A ADD-IN | MORE ADD-INS | TROUBLESHOOTING | DOWNLOAD |
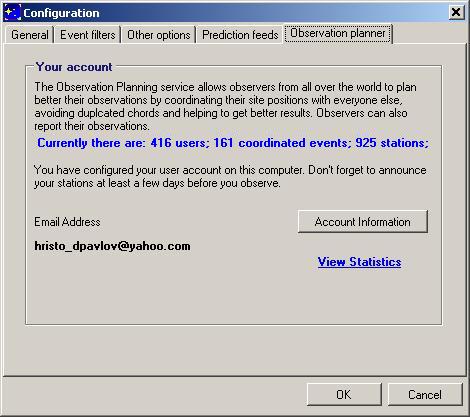
To best coordinate your observing efforts you need to first create a free Observation Planner account. After your account is setup you will be able to submit your intentions to observe, to see what chord everyone else is going to observe from and to use the automated weather predictions for your submitted stations provider by 7Timer. OccultWatcher is a client-server application and the server is often referred to as "Observation Planner" or "OccultPlanner". You can configure your account from the "Observation planner" tab in the configuration form. You can either create a new account or you can configure an existing account on a second computer where you may have OccultWatcher running (e.g. Work & Home)
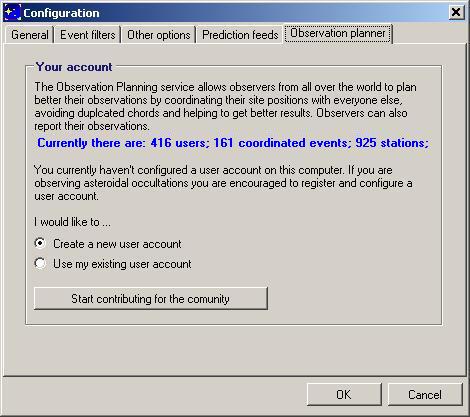
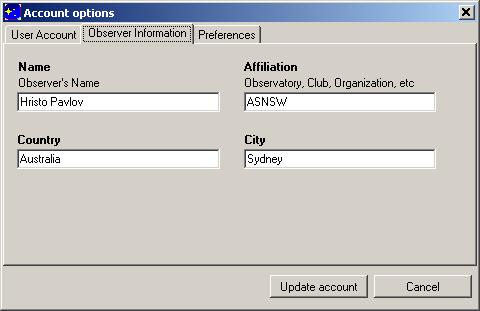
During the process of account creation you be asked to provide information about yourself. You can also update this information at a later time from the "Account Information" button.
From the first tab of the user informaion form you can change your password or email address or delete your account if you need to.
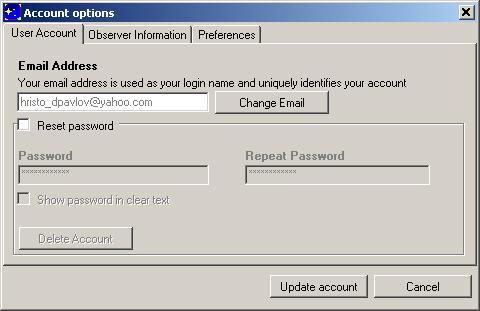
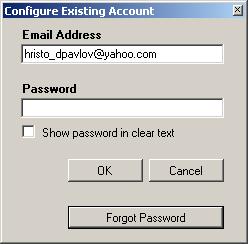
The OccultPlanner server does not store your password in a reversible way so if you have forgotten it, it cannot be retrieved back. However you can reset your password from the Configure Existing Account form by entering your OccultPlanner account email address and choosing "Forgot Password". To complete your password reset follow the prompts. Your account needs to have a valid email address in order to reset your password.
The Observer Information tab contains information you should fill in if you want to be recognized among the occultation observers. Providing your real name and affiliation is highly encouraged.
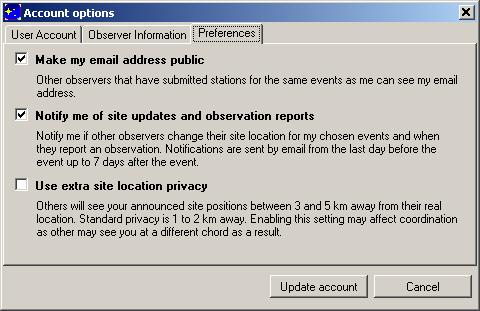
The Preferences tab contain three options. First is your permission for your email to be made public to other observers that have announced stations for the same events as you should they wish to be able to contact you. By default OccultWatcher keeps your email private. If you choose to make it public, it will be displayed in the station sorts form for those observers that have added the "Email" column to the view. The second option is your choice to receive emails from OccultWatcher. At the moment there are two types of emails sent to the observer. The first one is an email if any stations are added or updated in the 24 hours period before the event. The second email is sent when observers submit their results (positive/miss/clouded) to the OccultPlanner server and is only sent if the results are submited in the first week after the event. The last option from the preferences is the Extra Site Location Privacy. By default (when this option is not checked) OccultWatcher displays your submitted stations to other observers at least 1 km away from their real location in a random direction, but no more than 2 km away. This is a good compromise between keeping observer's privacy and still allowing chord coordination to be done at a high precision. If you wish a higher privacy of your stations then you can check this third option and your sites will be displayed to the other observers at least 3 km away in a random direction from their real location, but no more than 5 km away. For more information have a look at the Privacy page.
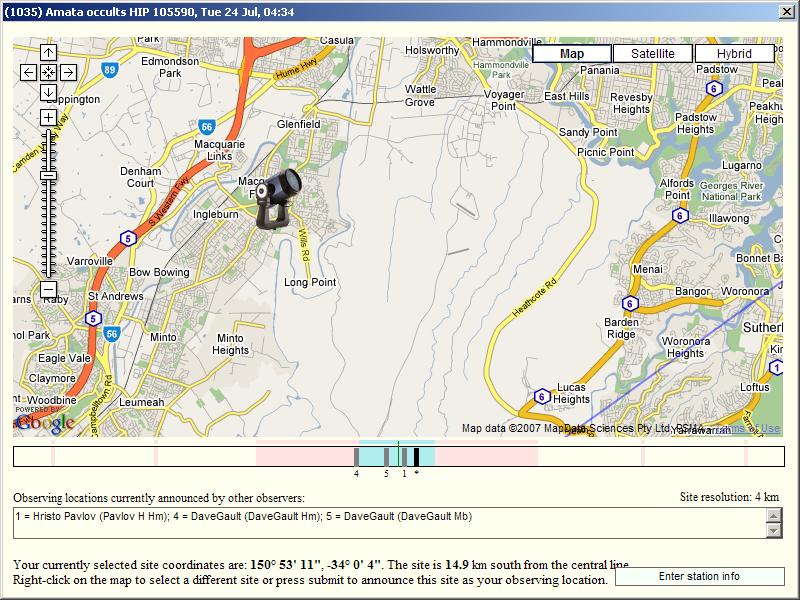
Once you have configured your account when you click on an event in the details panel you will see extra information - how many stations have been announced so far, how many of them are yours, where on the path are those stations. There will be also a "View stations sorts" link. The retrieval of the station information is done online every time you click on an event. This may require from half a second to a few seconds depending on your internet connection speed and on where is your location. So after you select an event you should wait until the "Show online map" text changes to "Show online map with stations" and the stations are displayed on the path chart.
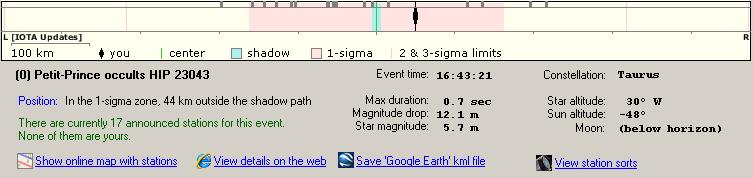
On the top of the path you can see the small gray bars which indicate the location of the announced stations across the predicted path.

When you open the GoogleMap it will include a path schema similar to the path on the details panel. The site locations announced by all observers will be displayed as gray bars across the path. The actual sites locations will be also shown on the map with a telescope marker. Depending on your settings you may also see the chord lines drawn on the map as well as the terminator and twilight lines and the star visibility line. Please note that in some cases, especially on large scale maps where most of the continents are visible, GoogleMaps may have an "ineresting" opinion on where the lines should be drawn. You may find that somes lines are missing, while they are actually drawn 360 deg left or right. Note that GoogleMaps shows more than 360 deg by repearing the continents to the left and right. If this happens to you just pan the map left or right and there is a chance that GoogleMaps may draw the line where you expect to see it.
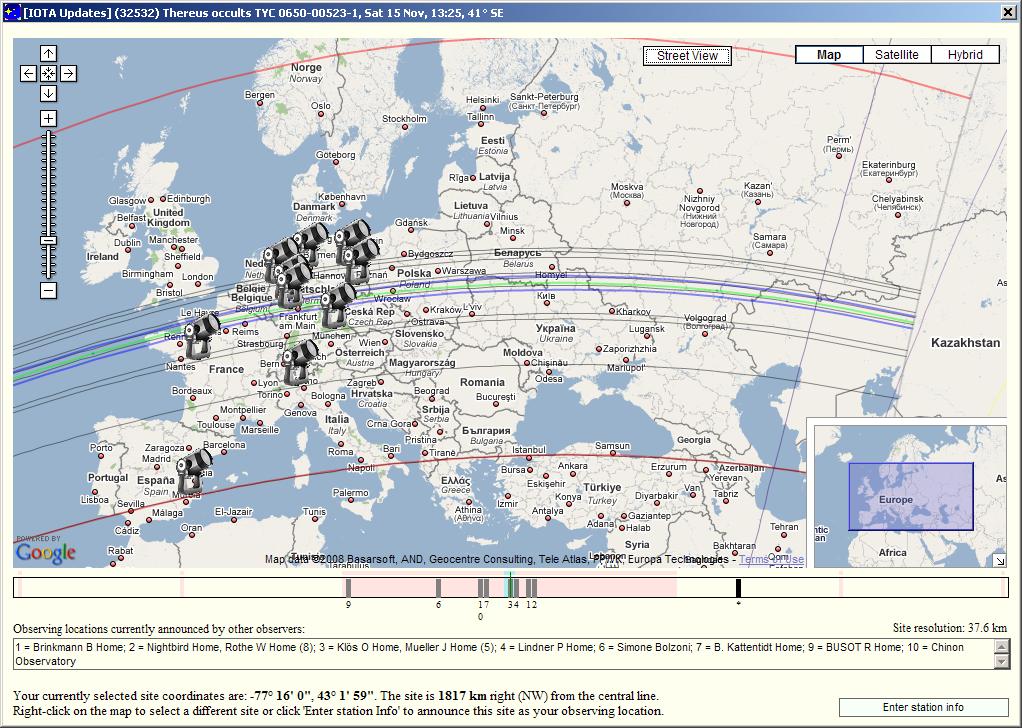
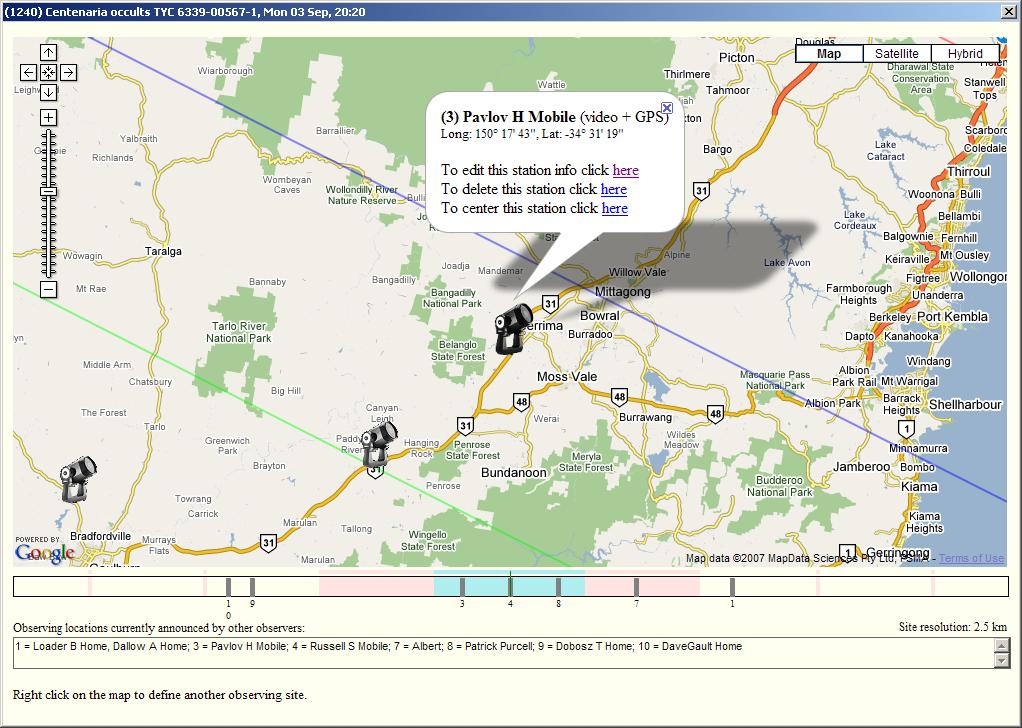
The small light gray telescopes indicate the sites announced by other observers. To keep the privacy of other observers their locations will be shown with degraded precision of +/- 1 to 2km (or +/- 3 to 5km if they are using the extra location privacy option). This also applies to how other observers will see your stations. The dark gray telescope markers show your previously announced stations. They are clickable and show a bubble with more options to edit or delete the site. The big dark blue telescope marker is the current site. It is used when you select a location for a new station or you move the position of a previously announced station.

The bars on the path are clickable and by clicking on them you can center the station. Because of the implementation technology used to draw the bars there is a site resolution which is shown on the right. The site resolution has the meaning of the minimal distance between two stations across the path which is required to draw the sites as two separate gray bars on the path. The site resolution depends on your screen resolution as well but it does not affect the precision of the announced station coordinates. It is only a display limitation in the software. If two stations are closer across the path than the current site resolution they will be drawn as one bar.

Announcing new station
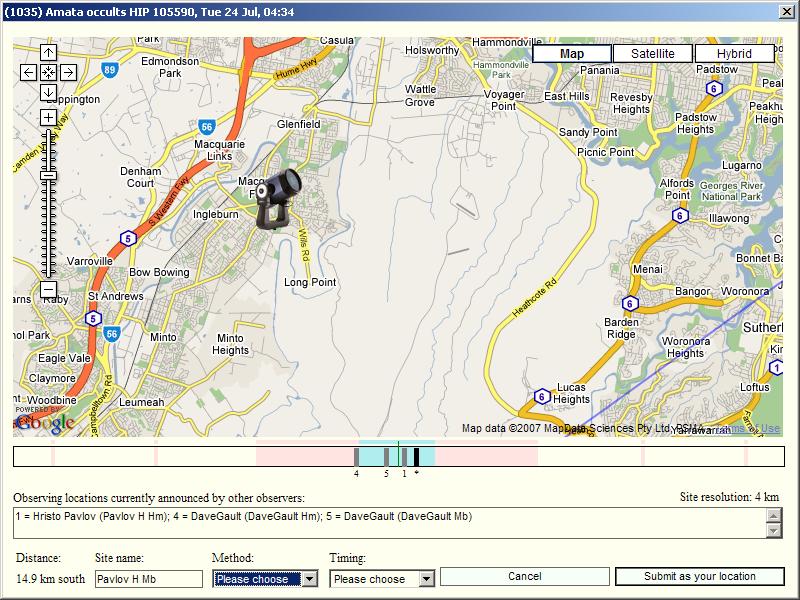
To announce a new station you have to first select its position on the map by right clicking on it. If you haven't announced any positions yet the default position will be preselected when you open the map and will have the coordinates of your configured location (in the configuration form of Occult Watcher). While choosing location for your site its position across the path will be shown on the predicted path as a black bar marked with *
After you select your location you should press "Enter station info" and you will be able to give this site a name and also choose your observing and timing methods that are going to be used. To announce the site press "Submit as your location" button.
Modifying already announced station
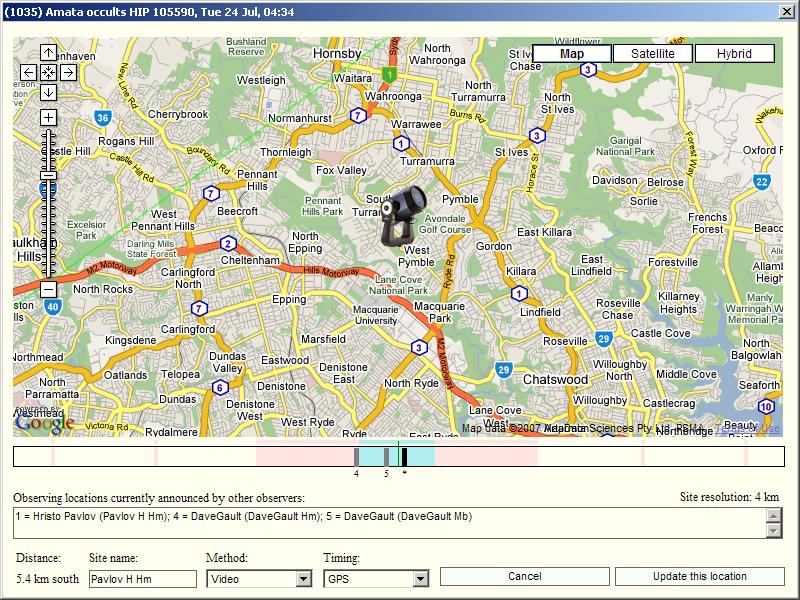
Stations previously announced by you will be shown as dark gray telescope markers. To modify your station info you have to press on the telescope marker and then click on the link to edit this station.
Once you do this the marker will become a bigger dark blue telescope. Now you can move the station to a different location by right clicking on the new place. You can also modify the site name, observing and timing methods to be used. When ready press "Update this location" button.
Deleting a station
To delete a station click on the dark grey telescope marker and follow the link to delete this station. Confirm the deletion.Preferred Mobile Locations
OccultWatcher allows you to maintain a list of your mobile locations which you tried and liked. Those preferred mobile locations can be displayed on the GoogleMap so you can pick one of them and announce a station quickly. You can also announce a station directly from the main event list.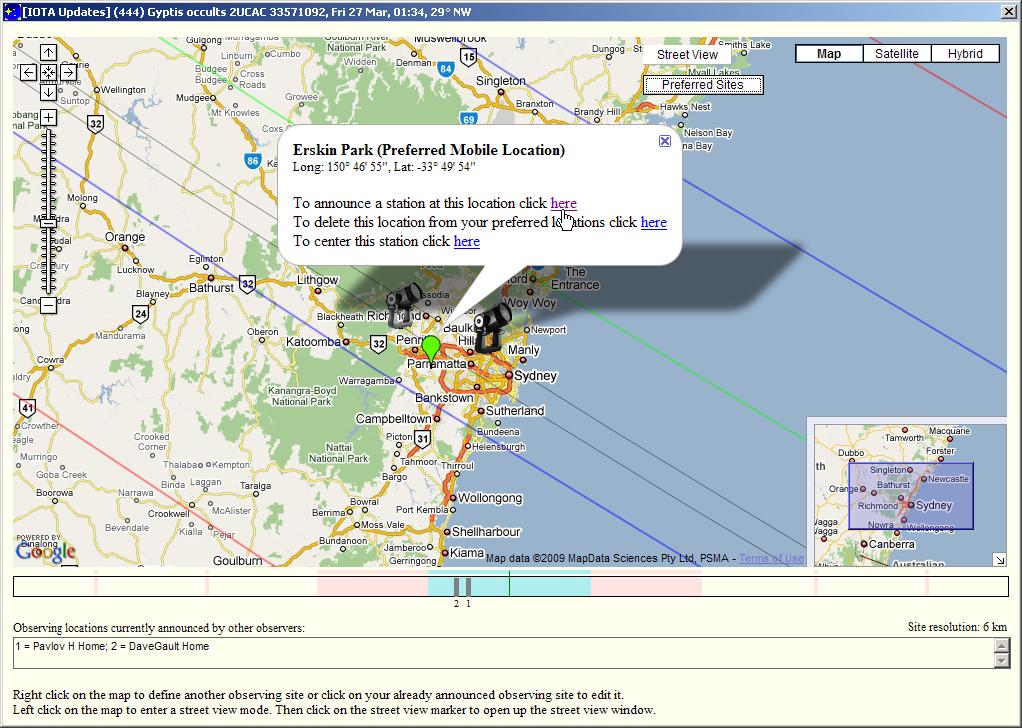
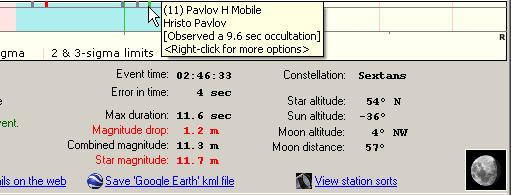
There are two ways you could add a site to your preferred mobile locations. The first one is if you right click on your announced station on the station bar and choose ".. add to my favorite mobile locations".
 |
 |
Once you have click on the menu, OccultWatcher will show up the Saved Sites form with the coordinates of the selected station prepopulated so you can change its name and save it.
You can also add a preferred mobile location directly in the Saved Sites if you check the "Preferred Mobile Location" checkbox.
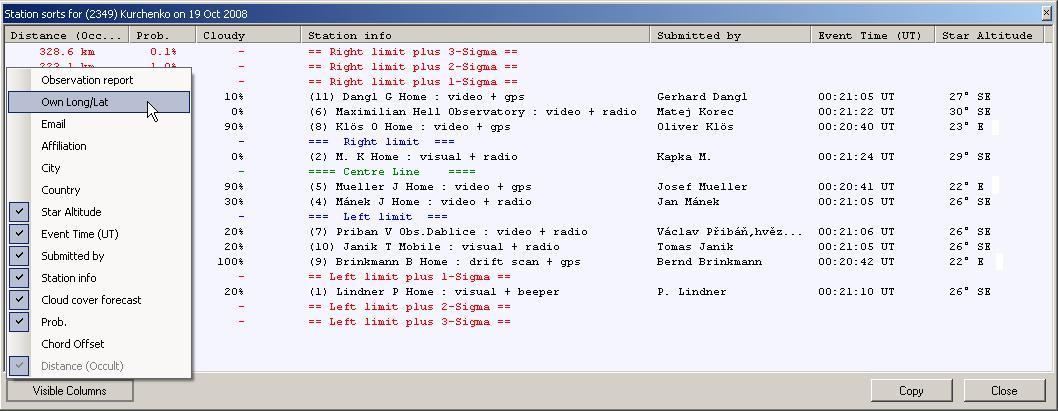
Station sorts
To see the station sort click on the "View station sorts" link on the event details panel. The Distance (Occult) is the distance of the site from the center line as defined by Occult. The only difference is that Occult uses for the direction only E, W, S or N while OccultWatcher uses all E, NE, N, NW, W, SW, S and SE.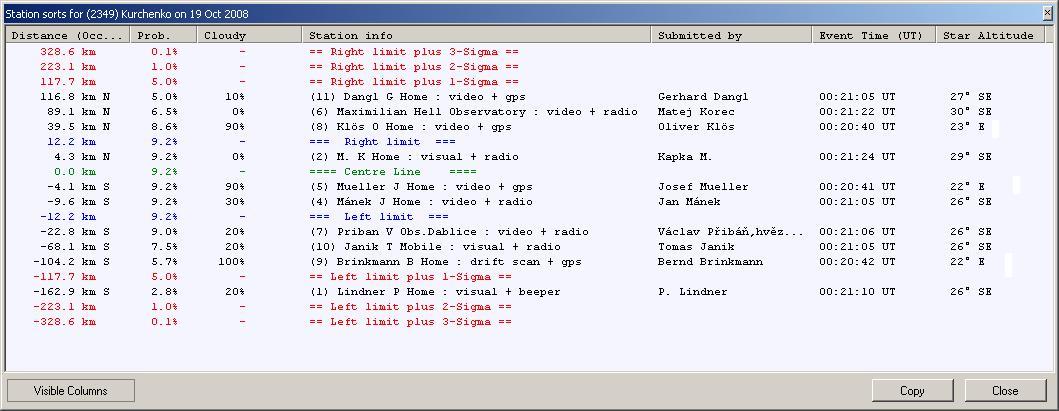
The station sort grid allows the user to choose which columns to be displayed from the "Visible Columns" button. The column names are straight forward. The "Own Long/Lat" will show you the exact position of your own stations only, which you could use to enter in your GPS for example.
Reporting observations
Since version 3.0 OccultWatcher now can store observation reports on the OccultPlanner server. This may be very useful for the observers to quickly communicate the results of their observations. To report an observation you first need to have an announced station for the given event. After the event has passed there will be a "Report Observation" menu item in the context menu i.e. when you right-click on the event.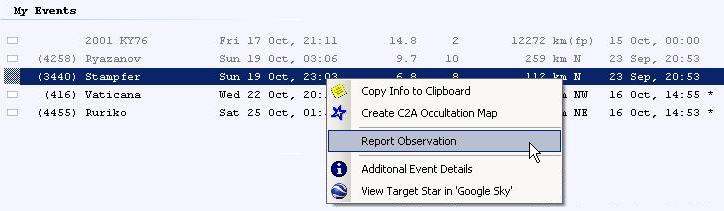
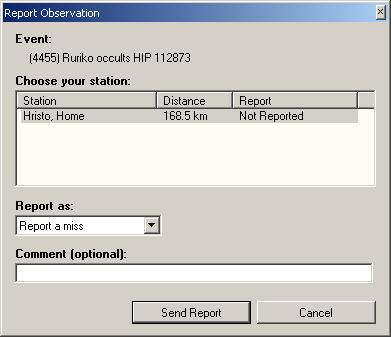
To report your observation choose whether this has been a positive occultation, a miss or whether you have been clouded out or failed to observe for a different reason. The observer can also leave comments, which will be shown to the other observers. In a case you have more than one station for the event, all stations will be listed and you could select any of them to report your observations.
Once your report is submitted other observers will be able to see it when they select the event. This is why you may want to keep showing old event from the past couple of days. The misses will be shown with a red marker, the positived with a green marker. Black marker means the observer was clouded out or failed to observe and the normal gray color will indicate that no report has been made. Those colour codes can be customized by choosing a "Custom" colour scheme from the options. When you hover your mouse over a station you will see the report and any comments the observer may have entered.
